Aluminium Chassis für WLToys A959

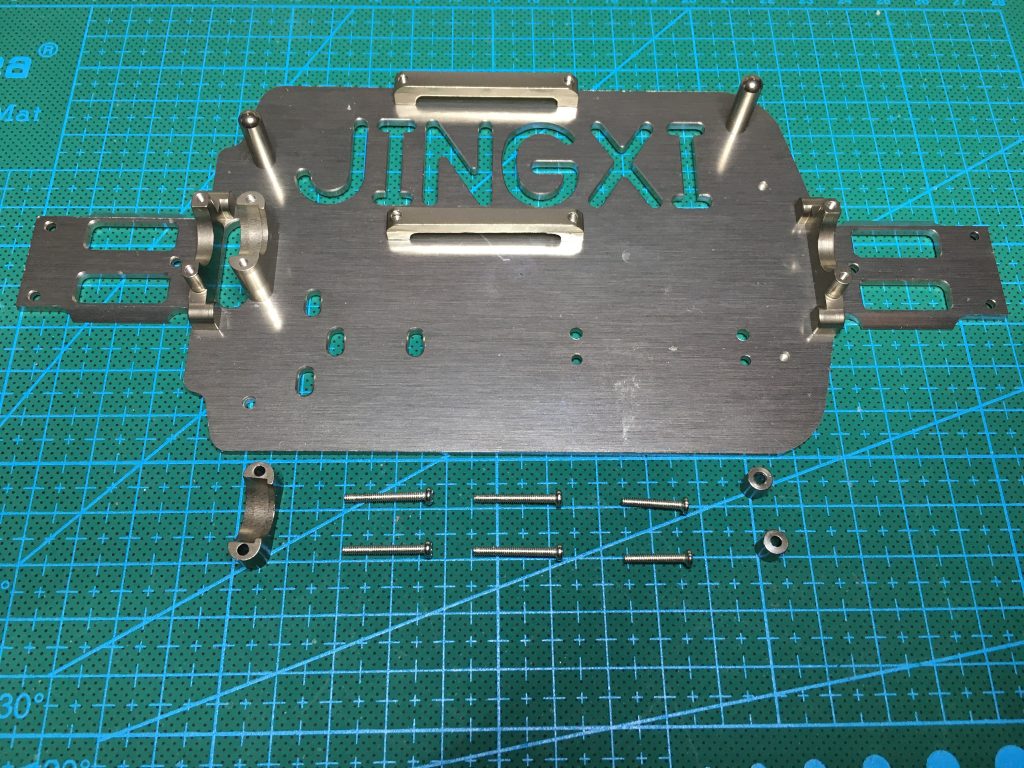
Ich habe bei Banggood ein Aluminium Chassis für meinen WLToys A959 gefunden. Der Preis ist mit knapp 14€ gut, also schnell bestellt und ausprobiert.

Jing Xi Aluminum Chassis für WLToys A959

Leider haben es die Chinesen nicht so genau mit den Maßen, so fehlen hier an einigen stellen die entscheidenen Millimeter und der Zusammenbau war mit den Standardteilen des Modells gar nicht möglich.

„Aluminium Chassis für WLToys A959“ weiterlesen

Geschwindigkeit vom WLtoys A959

So, nachdem ich schon einige Runden mit dem WLtoys A959 drehen durfte, kann ich sagen das Ding ist schnell…. sau schnell.

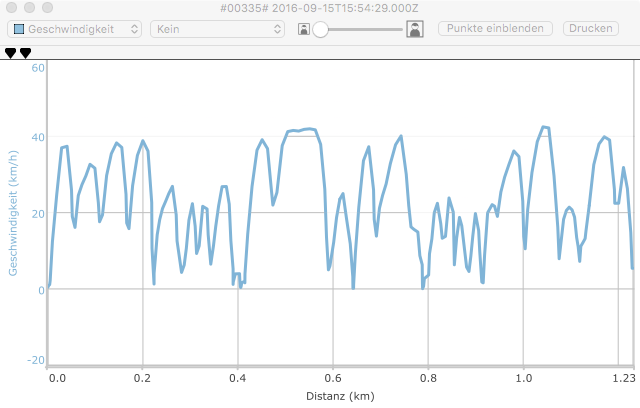
Da man sich aber gerne von den Marketing Angaben (bis 50 km/h) blenden läßt, habe ich einfach mal einen GPS Logger aufgeschnallt und es gemessen.

geschwindigkeit-a959
Die Geschwindigkeit des A959 auf gerader Straße

Es sind nicht wirklich 50+ km/h, aber der maximale Wert von 44 km/h ist nicht so weit entfernt.

Bei einigen der anderen Modellen kommt die Geschwindigkeit wohl eher hin, da sie über größere Reifen verfügen.

RC Car WLtoys A959

Seit langem habe ich mit dem Gedanken gespielt mir ein RC Auto zuzulegen, jedoch nicht den richtigen Einstieg gefunden. Davon abgehalten hatten mich Fragen wie: “Was für ein Motor ist der Richtige?” oder “Gibt es Upgrades und wenn ja welche?”.

Da ich mehr am Basteln und nur ein wenig am Fahren interessiert bin, erschienen mir die günstigen Modelle aus dem Spielzeugladen als ungeeignet: Keine oder schlechte Ersatzteilversorgung, keine Upgrades und begrenzter Fahrspaß, nur um einige der Nachteile zu nennen. Auf der anderen Seite die teureren Modelle von den Modellbau Spezialisten: Gute Upgrade Möglichkeiten und Ersatzteilversorgung bieten nahezu unbegrenzten Bastelspaß und perfekt fahren werden die Dinger auch. Leider gibt das mein Budget nicht her, gerade als “Anfänger” in diesem Bereich.

Da ich regelmäßig in China direkt bestelle – aus Nervenkitzel und weil es sau günstig ist – hatte ich seit einiger Zeit bei Banggood.com ein Modell entdeckt, das anscheinend beide Aspekte vereinen kann: Günstig (deutlich unter 100 Euro) und gute Ersatzteilversorgung und viele Upgrades verfügbar: WLtoys A9x9 Modelle:

WLtoys A949 - Rally Cross
WLtoys A949 – Rally Cross

WLtoys A969 - Trophy truck
WLtoys A959 – Off Road Buggy

WLtoys A969 - Trophy truck
WLtoys A969 – Trophy truck

WLtoys A979 - Monster truck
WLtoys A979 – Monster truck

Bei allen Modellen handelt sich um Ready-to-Drive Kits mit im Endeffekt dem gleiche Chassis,  jedoch Unterschiedlicher Karosserie und Bereifung. Die Specs lesen sich für alle mehr oder weniger identisch:

Antrieb  Allrad
Masstab  1:18
Batterie  7,4V 1100mAh Lipo mit Ladeteil
Fernsteuerung  2.4 GHz, 100m Reichweite
Motor  390 (Brushed)
 Aufhängung   Einzelrad mit Federung
Geschwindigkeit   bis 50 km/h
Ladezeit   150 Minuten
Laufzeit   ca. 10 Minuten
Ausführung  überwiegend Plastik

Was mich bewogen hat letztendlich eines dieser Modelle zu kaufen, war natürlich der Preis und die Verfügbarkeit von Ersatz- und Upgradeteilen.

Pro:

  • Preis
  • Ersatzteile / Upgradeteile Versorgung
  • Geschwindigkeit
  • Verarbeitung / Design

Contra:

  • kein Brushless Motor
  • ansonsten nicht viel bei dem Preis.


Fazit: Interessante, günstige Technik für Einsteiger. Ich habe mich entschieden und das Modell WLtoys A959 entschieden, da ich sowohl im Gelände als auch auf asphaltierten Untergrund fahren will.

First Steps with Rasbian

Today I freshly installed Raspian on a new SD card; basically it’s just dd’ing the downloaded image to the SD card, e.g. on MacOSX:


sudo dd if=2013-07-26-wheezy-raspbian.img of=/dev/rdiskX bs=1m

Please do not blindly run the command above as you need to know the correct device number, so replace the X with something that indicates your SD card. If you are new to this, good idea is to follow the documentation of RPi Easy SD Card Setup. It contains installation instructions from most common OS versions like Linux, MacOSX, or Windows.

First thing I wanted to figure out is details about hardware and monitoring. I found that the Broadcom VideoCore tools are useful for this and already installed on the system in /opt/vc/. With the command vcgencmd can you e.g. request the core temperature of the Broadcom SoC:

pi@pi2 /opt/vc $ /opt/vc/bin/vcgencmd measure_temp
temp=38.5'C

More details about vcgencmd can be found on elinux.org’s RPI vcgencmd usage page or, with a complete command overview, here:

https://github.com/nezticle/RaspberryPi-BuildRoot/wiki/VideoCore-Tools

RIP Cobalt, Hello Raspberry Pi

To be honest, I didn’t use my Cobalt system no longer for quite a while now. As I still believe that the design was pretty good and the systems are working without any serious issue, it’s time to make place for new, even better designs and technology.

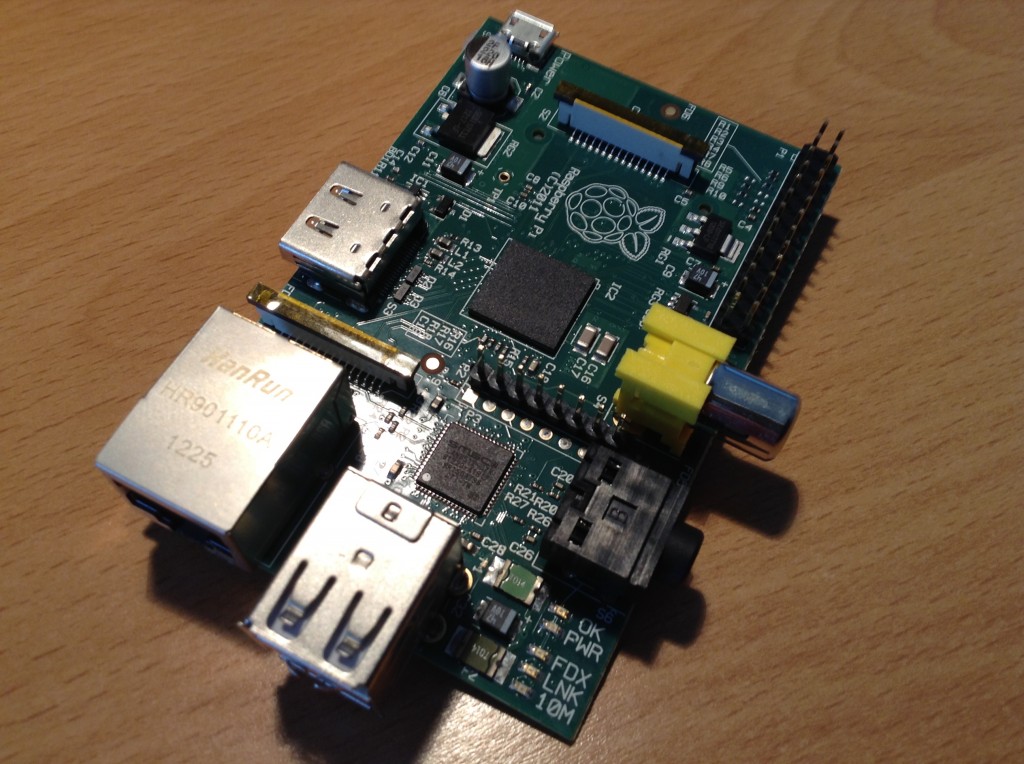
In the meantime I own two Raspberry Pi‘s Model B Boards:

Raspberry Pi Model B Board

It build around a SoC (System on Chip) Broadcom BCM2835 with ARM11 700 Mhz CPU, dual core GPU with 1080p30 Full HD HP H.264 Video Encode/Decode on HDMI port, (XBMC is running like a charm, will report later), one 10/100 wired Ethernet RJ45 port and two USB 2.0 interfaces, Composite video and so on.

Details of the Boards can be found on the elinux.org RPi Hardware page.

Poll: The Biggest Disk Size Configuration

After getting a comment from Bas and seeing some questions on the Debian mailing list, I want to know your biggest HD used in any type of Mips/i386 style cobalt machines. Please drop me a comment with you configurations – e.g. what machine, how many drives, which drives – and your experience like performance, stability etc.

Did you ever try to add some additional Card like IDE, SATA or USB (or combi cards) in your Cobalt machine? I would like to know if this was successful or not and what about drivers, performance, power consumption and so on.

What is the use of the storage space? Did you use media streaming (upnp, dlna, daap, etc.), file sharing (nfs, smb, etc.), NAS (iscsi) ore something else?

Please drop a comment with your configuration.

led-set utility for Cobalt server

Today I release the first version of led-set for cobalt machines. Now there are some command line options, a help, getting led status on i386 based cobalt systems, support for MIPS architectures etc.

This small utility is based on the cobalt-panel-utils original provided by Sun Microsystems. This utilities are able to set the LCD of the Cobalt machines and read the Button, but not to set the extra LED some of the machine have.
I own a MIPS bases Qube2 and two i386 machines, the RaQ4r and a RaQ3. The Qube is a great small machine with low power consumption and ideal as use for a home server. The only thing which was disturbing are the bright LED bar on the front and I search for a method to switch it on or off based on the daytime. The both RaQ machines I use with out a FAN to reduce the noise, but if there is some traffic on the machines, the CPU’s may getting to hot. They have a special “Web LED” which isn’t used outside the original software (all systems are updated to running Debian or Ubuntu in the meantime). I searched for a way to control the LED so that I can build some small hardware extension to control the fan’s, the Web LED is a perfect solution for this.

This ideas lead to this small util led-set.

installation:

The building and installing of this small utility is quite easy. The only thing you need is a GCC compiler and make tools installed. To build and install this utility just run:

# make && make install

This will build the utils and copy the executable to /bin/led-set

Usage:

The usage should not be to complicated. By running the command with the -h option you get the help of this tool:

Usage: led-set [OPTION]...

Mandatory arguments to long options are mandatory for short options too.
-s, --state       return the actual state of the LED as exit code. To display
                  the value you might use the -v|--verbose option too.
                  This is not supported on MIPS, the return will be always 0.
-h, --help        display this help and exit
-v, --verbose     switch on verbose message, e.g. when showing the LED state .
-l, --led=STATE   Set the new state for the LED as numeric value.

Possible States:
MIPS:      0    All   Switch LEDs off
           1    Qube  Front LED bar left on (COBALT_LED_BAR_LEFT = (1<<0))
           2          Front LED bar right on (COBALT_LED_BAR_RIGHT = (1<<1))
           3          Both front LED's
           4    RaQ   Web LED on (COBALT_LED_WEB = (1 << 2))
           8          Power LED off (COBALT_LED_POWER_OFF = (1 << 3))
          15    All   Reset the LED's (COBALT_LED_RESET = (0x0f))
i386:      0    All   Switch LEDs off
           1          LED_SHUTDOWN = (1 << 0)
           2          Switch on the Web LED (LED_WEBLIGHT = (1 << 1))
           3          Switch on the Cobalt/Sun Logo (LED_COBALTLOGO = (1 << 2))

WARNING: There are more possible values for controlling LED you may wish to try.
If you try them you are trying them completely on your OWN RISK! Please
keep this always in mind that this options might be dangerous.

There might additional LED’s depending on your Cobalt machine type. To get (mostly) all supported values you may need to look up the kernel sources for the cobalt drivers, specially the files ./include/asm-mips/mach-cobalt/cobalt.h or ./include/cobalt/led.h, depending on the arch type.

If you find additional combinations, please post this as comment to this Blog entry and let me know which led-state do what on which hardware (machine name and/or systype (cat /proc/cobalt/systype) on i386 machines). If you have questions, ideas or issue, please feel free to contact me too.
Make the web LED work on a Cobalt RaQ3/RaQ4

At the moment i use a Cobalt RaQ4r (system type Pacifica) as a server running Ubuntu 7.04. The RaQ’s have a special LED on the front panel which was used from the original Software to show activities on the HTTP server. This LED is labeled as WEB.

Looking to the kernel sources I figured out that the LED on Pacifica systems is controlled by the ALi M7101 PCI device. So I tried to set the LED with the help of setpci command. This works, but the light is just flash one time, not what I expected. „Make the web LED work on a Cobalt RaQ3/RaQ4“ weiterlesen